What to do if WiFi says "No internet secured" on Windows
That moment when your laptop says, “No internet, secured,” might be one of the most frustrating tech experiences. Of course, it happens five minutes before your Zoom meeting, or just as you’re about to hit ‘send’ on an important email. I have wrestled with this exact issue many times on my Windows 10 laptop, and if you want to learn what to do if wifi says no internet secured then know that most solutions are simpler than you’d think. Let us cut through the tech jargon and get your WiFi back. Here is what’s really going on and how to troubleshoot it like a pro.
What does “No internet secured” mean?
Many users run into the no internet secured Windows 10 message on Windows 10 laptops, but what does it really mean?
It’s actually two separate problems pretending to be one. The ‘secured’ part is fine because it means your WiFi password worked and that no one is hacking your WiFi, but the ‘no internet’ part confirms a communication breakdown. It means that you are connected to WiFi, but not the internet.
Your laptop has successfully connected to the router, yet your browser and apps can’t reach websites or services online. This is exactly what users say they have wifi connected but no internet or no internet access but connected to Wifi. This is a classic case of Wifi no internet access and your laptop thinks it is connected, but it actually is offline.
Why I See “No Internet, Secured” on Windows and Laptops?
Windows 10 & 11 laptops handle network status checks differently from other devices. People often ask how do i fix no internet secured or why does it say no internet secured on laptop? This alert usually means one of three things:
Windows Configuration Problems (most common)
These are glitches or mistakes within your laptop:
- Your WiFi driver is outdated or corrupt.
- You have got manual IP or DNS settings left behind after connecting to a different network.
- Windows sometimes fails to detect login pages and assumes there is no internet.
- A recent Windows update may have reset your network adapter.
Router or Connectivity Issues
If other devices are also struggling, your router or internet connection might be to blame:
- The router may simply need a reboot.
- Your router’s firmware might be outdated.
- There could be a temporary ISP issue.
- Poor router signals.
- Some routers have MAC address filtering enabled. If your device’s MAC address is not listed on the router’s approved list, you can face connectivity issues.
If your router appears fine but no device connects, this might be the case of WiFi no internet access, that is your device connects to the network but fails to communicate with the internet.
Software Conflicts
Installed software can quietly block your internet access:
- A VPN might have a kill switch enabled.
- Firewalls or security apps might block internet connectivity.
If your phone or tablet works on the same WiFi, the problem is almost always in Category 1 (your laptop’s settings). If all devices fail, check Categories 2–3.
What to do if wifi says “no internet secured”?
So, how do you fix no internet secured? The answer depends on what’s causing the problem.
Network bugs can easily make us feel overwhelmed but most “no internet secured” errors can be fixed by walking through simple steps. Always test your connection once you apply a fix before trying the next solution.
Start with the basics:
1. Restart router and your laptop
Uptime glitches happen more often than we think.
One of the simplest fixes for “no internet, secured” error is a complete restart of both your router and laptop. This helps clear out temporary glitches and refreshes your devices.
Unplug your router or switch it off and wait at least 30 seconds. Plug it back in and let it fully reboot. At the same time, restart your laptop so that all network-related processes start afresh. Once both devices are back on, reconnect to your WiFi and check if the error has resolved.
2. Get closer to the router
Weak WiFi signals fail to maintain full internet access and end up giving “no internet, secured” error. This often happens when you are at the edge of your router’s range.
Getting physically closer to the router can improve signal strength. Simply move your laptop to the same room as your WiFi router or as close as possible. Wait a few seconds to see if the connection stabilizes. If the internet starts working again, it confirms that signal strength was the issue.
3. Forget the connection and reconnect to the WiFi network
Over time, your device may store outdated or incorrect network information, which can cause the “no internet, secured” message. Forgetting and reconnecting to the WiFi network allows your computer to start a proper connection from scratch.
- Go to Settings > Network & Internet > WiFi > Manage known networks.
- Find your WiFi network in the list, click on it, and select ‘Forget’.
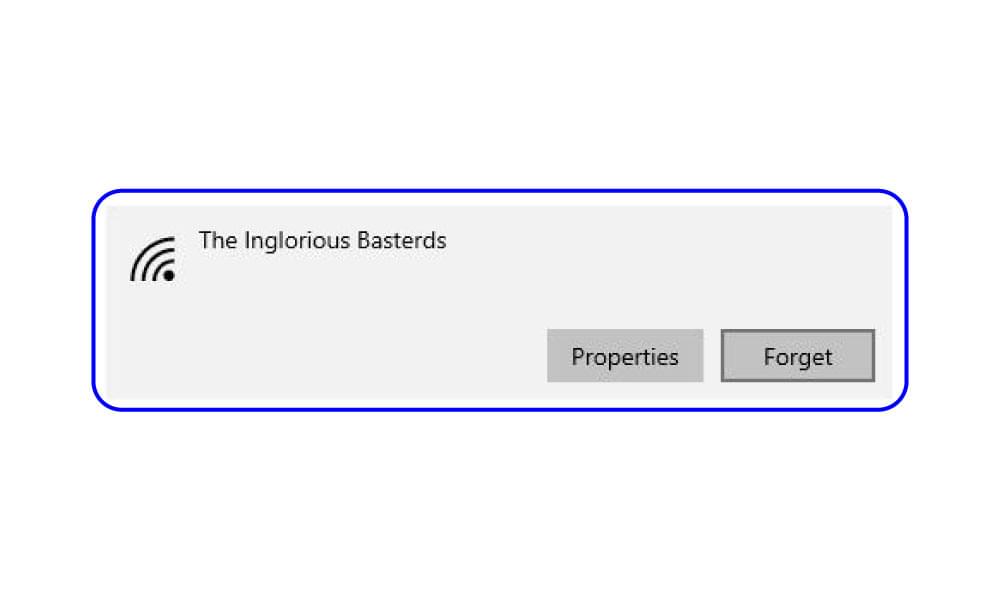
Then reconnect by selecting the same WiFi network from the list of available connections and re-entering your password. This method helps when everything looks fine but you still have no internet access on laptop.
4. Use Network Troubleshooter to automatically find and fix errors
To quickly identify and fix network issues on your Windows device, you can use the built-in Network Troubleshooter.
- On Windows 10, go to Start > Settings > Network & Internet, then click on ‘Status’.
- For Windows 11 users, navigate to Start > Settings > Network & Internet, then scroll to ‘Advanced network settings’.
- Find the ‘Network troubleshooter’ option.
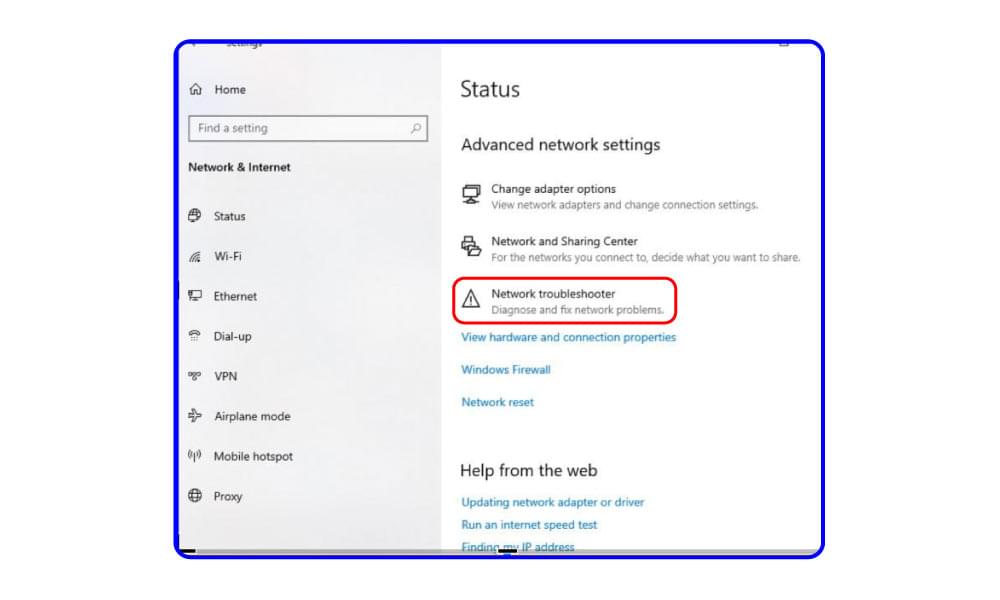
Click on it and follow the on-screen instructions. Windows will automatically scan for any connection problems and will suggest or apply fixes to restore your internet connection.
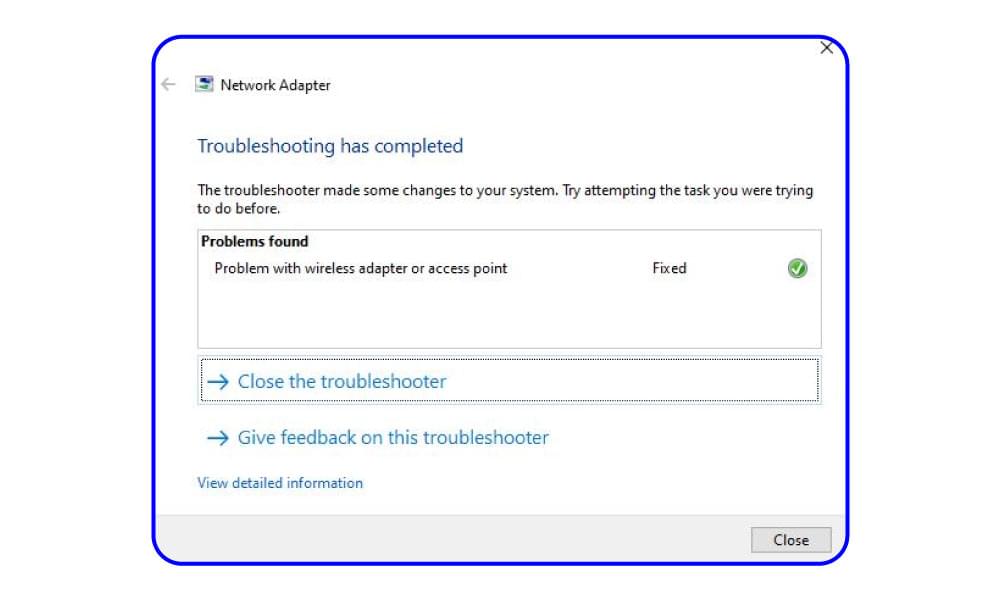
5. Use Network Troubleshooter to reset network
Windows 10 & 11 offer a built-in Network Troubleshooter designed to find and fix common internet connection problems automatically. It can recognize issues with your network adapter, IP settings, or background services.
- Go to Start > Settings > Network & Internet.
- If you are on Windows 10, click on ‘Status’.
- For Windows 11, choose ‘advanced network settings’.
- Then click ‘Network reset’ and follow the on-screen instructions.
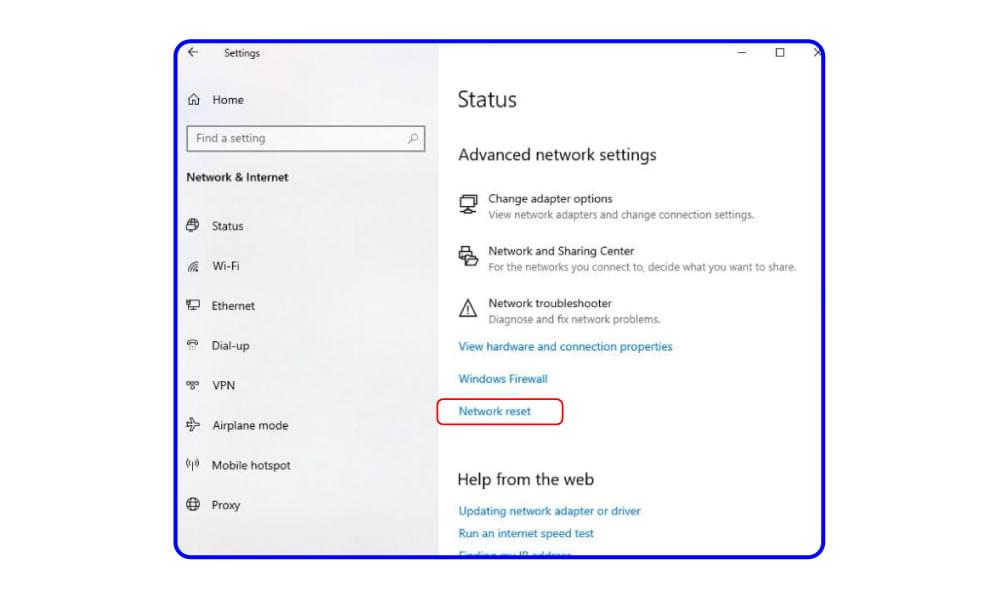
Let Windows scan for hiccups and apply any recommended fixes. Once it’s done, test your connection again.
Running this tool is a good idea when you are not sure what is causing the error wifi connected but no internet access.
6. Automatically update WiFi driver
Keeping your WiFi driver up to date can fix internet connectivity problems.
- Open ‘Device Manager’ > ‘Network adapters’ section.
- Right-click at your WiFi adapter to select ‘Update driver’.
- Choose ‘Search automatically for drivers’ when the next window pops up.
If Windows finds a newer version, it will install it. Once the process completes, restart your PC and check if your connection has improved.
7. Manually update your Wifi driver
If updating the wifi driver automatically does not help then manually reinstalling the driver can fix issues caused by corrupt files.
- Open ‘Device Manager’ and expand ‘Network adapters’.
- Right-click your WiFi adapter, and choose ‘Uninstall device’.
- Confirm by clicking ‘Uninstall’.
- Let the uninstallation complete and then restart your computer.
Windows will automatically detect your WiFi hardware when it reboots and will reinstall the driver. After the system fully loads, try and reconnect to your WiFi network.
8. Disable and enable the Wifi adapter
Sometimes, simply turning the WiFi adapter off and on from Windows can reset its functionality and restore internet access.
- Press Windows + R and type ncpa.cpl
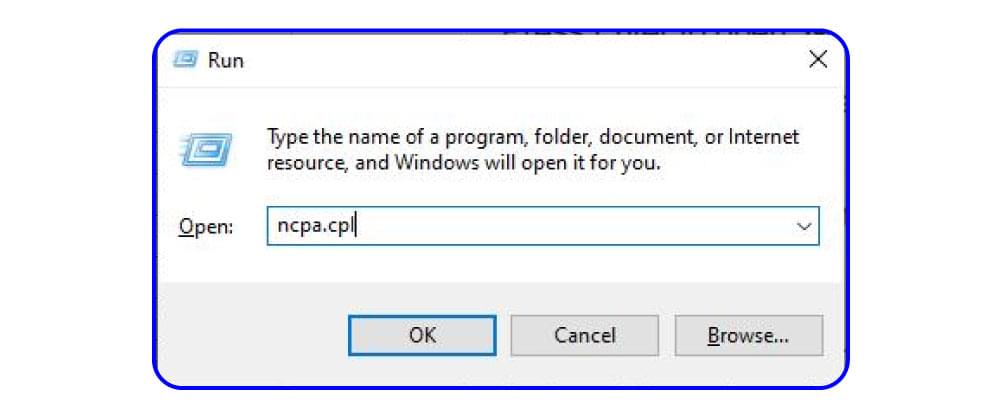
- Press Enter to open ‘Network Connections’.
- Locate your WiFi adapter, right-click it, and choose ‘Disable’ option.
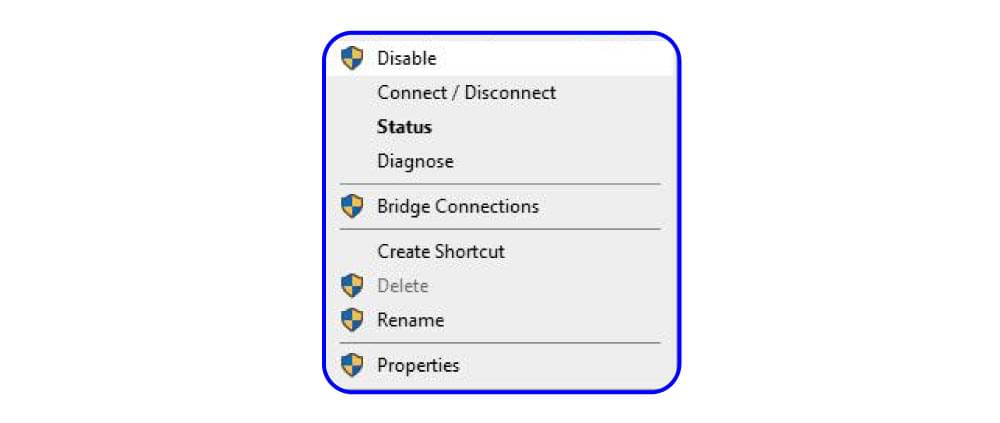
Wait a few seconds, then right-click it again and choose ‘Enable’. This reset helps clear glitches that may be affecting your connection.
9. Disable IPv6
IPv6 (Internet Protocol Version 6) is a latest internet addressing system. It is designed to replace IPv4. It offers a much larger pool of IP addresses and improved routing efficiency. However, not all networks, routers, or ISPs fully support IPv6 yet.
In such cases, keeping it enabled can sometimes cause connection problems like the “No internet, secured” error. To disable it:
- Press Windows + R
- Type ncpa.cpl. Press Enter.
- In the ‘Network Connections’, right-click your WiFi adapter and choose ‘Properties’ option.
- Find ‘Internet Protocol Version 6 (TCP/IPv6)’ and uncheck it.
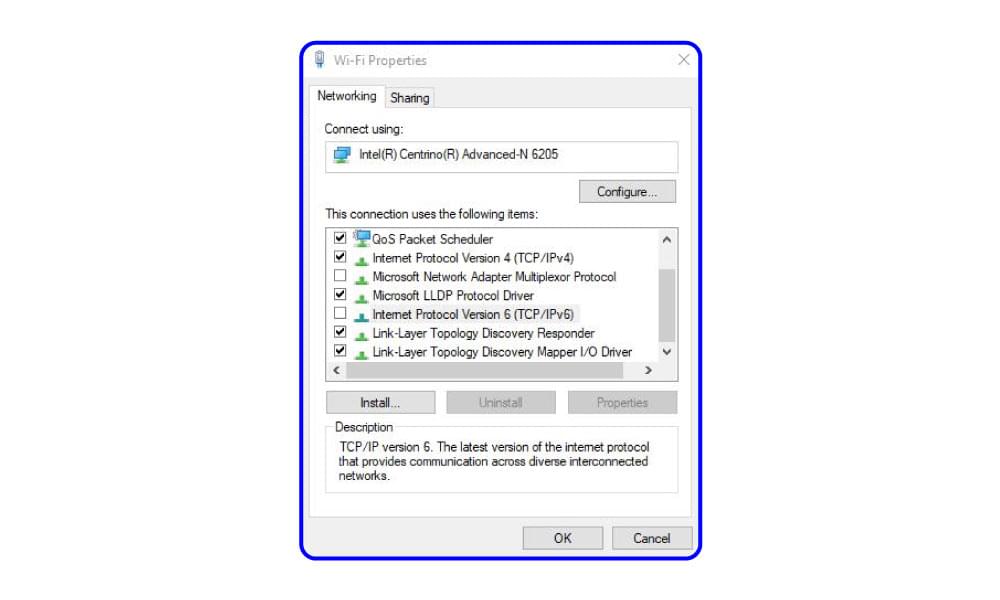
- Click ‘OK’.
If your network is not using IPv6 effectively, disabling it can help restore a more steady connection.
10. Check power management
Windows sometimes turns off certain devices to save power and it includes your WiFi adapter too. This can unintentionally disrupt your internet connection. To check this setting,
- Open ‘Device Manager’ > ‘Network adapters’ section.
- Right-click your WiFi adapter. Select ‘Properties’ > ‘Power Management’ tab.
- Make sure the option “Allow the computer to turn off this device to save power” is unchecked.
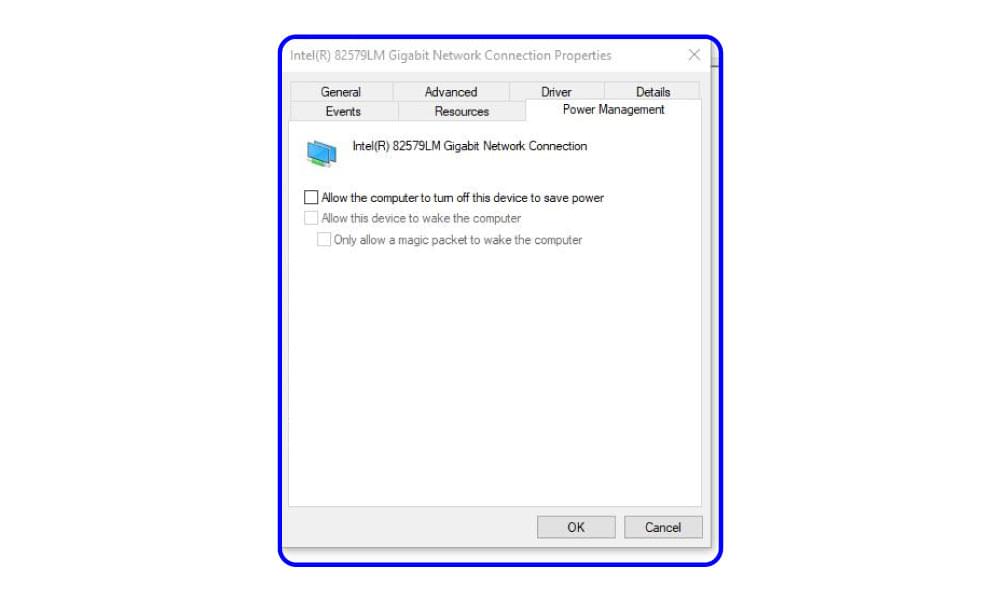
- Click OK.
Disabling this setting ensures your WiFi stays active, especially during idle times or on battery power.
11. Do a Winsock reset
If your internet connection is acting up, corrupted network configuration or socket errors might be the reasons. Perform a Winsock catalogue (which handles network requests) reset to clear out these issues.
- Press ‘Ctrl + Shift + Esc’ together to open task manager. Go to ‘File’ > ‘Run New Task’.
- Type cmd, and check the box saying ‘Create this task with administrative privileges’. Click ‘Ok’
- Now, type the below commands one by one. You must press Enter after each command.
o ipconfig /release
o ipconfig /renew
o ipconfig /flushdns
o netsh winsock reset
These commands will refresh your IP settings and will reset the Winsock catalog. After running them, restart the device to let the changes take effect.
12. Try DNS server address update
Incorrect or unresponsive Domain Name Server (DNS) settings might be blocking your access to websites even if your WiFi is connected. To fix this,
- Press ‘Windows + R’.
- Type ncpa.cpl, and press Enter.
- In the ‘Network Connections’, right-click your WiFi adapter and choose ‘Properties’ option.
- Select ‘Internet Protocol Version 4 (TCP/IPv4)’ and then select ‘Properties’.
- In the new window, make sure “Obtain DNS server address automatically” is selected.
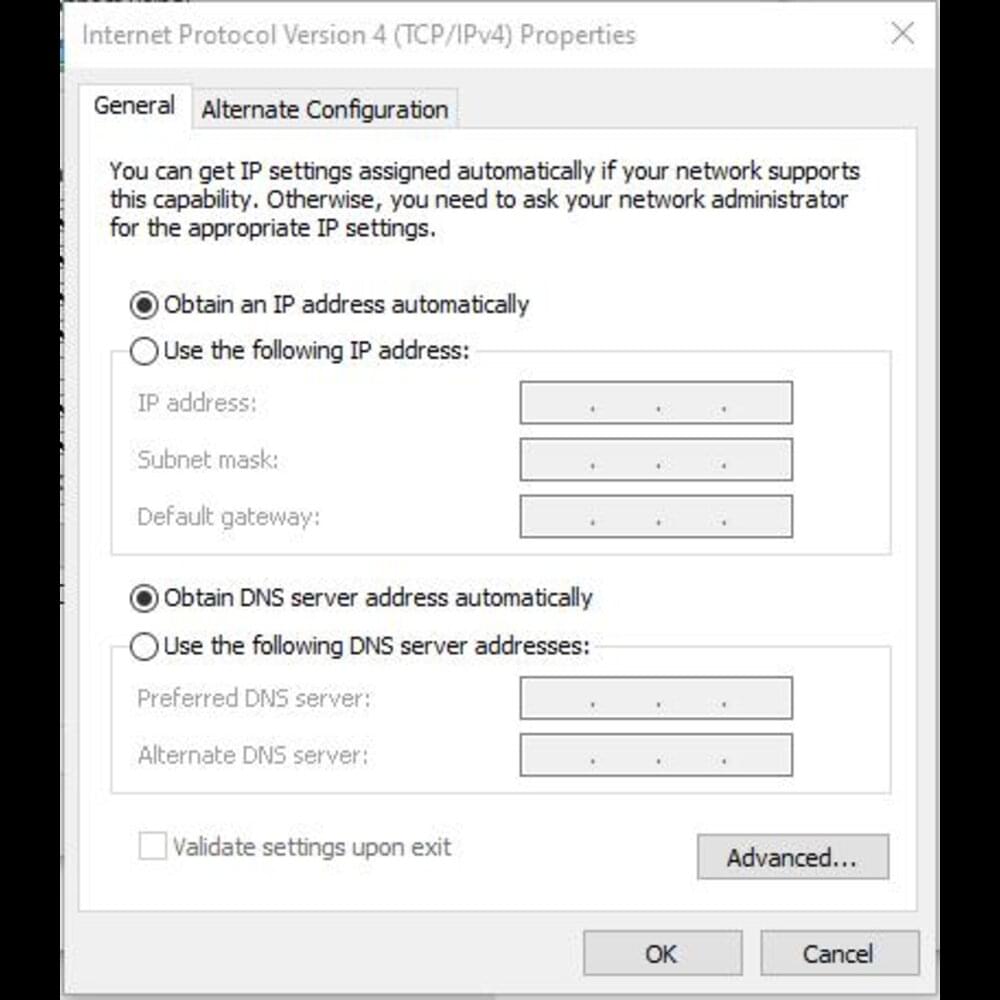
- Click OK.
Restart your PC/laptop and check your internet connection. After these settings your laptop uses your network’s default DNS settings. These changes can help solve connectivity issues caused by custom or outdated DNS entries.
13. Fix Connection Properties
Wrong settings in your connection properties can also cause the “No internet, secured” error. Here is how you can check if correct settings are configured and fix them if they are not:
- Press Windows + R.
- Type ncpa.cpl and hit ‘Enter’.
- Right-click your Wi-Fi connection and select ‘Properties’.
- Ensure the following options are checked:
o “Client for Microsoft networks”
o “File and printer sharing for Microsoft networks”
o “Internet protocol version 4 (TCP/IPv4)”
o “Link-layer topology discovery responder”
- Click “OK,” restart your PC, and check your internet connection.
These settings secure and establish a network connection. If they are disabled, it can be the reason for limited or blocked internet access.
14. Turn off VPN, antivirus and firewalls
VPNs are great for privacy, but sometimes they cut off all traffic if the secure tunnel drops, which may cause internet connection problems such as “no internet, secured” error.
- Disconnect any active VPN and see if your connection returns.
- If the internet works after disconnecting, check your VPN’s ‘kill switch settings’, or try to update or reinstall the VPN app.
- If disabling the VPN resolves the issue, consider switching to a more reliable VPN.
Similarly, disable antivirus or firewall to avoid their interference. Turn them off for a while to see if your internet is restored.
15. Router firmware update
Log in to your router’s admin page. You can access it by typing the router’s IP address such as 192.168.0.1 or 192.168.1.1 into your browser’s address bar.
Once you are logged in, look for a Firmware Update or System Update option. Every router brand has a slightly different process, so refer to the router manual or check the label on the bottom of the router for instructions.
If a firmware update is available, install it carefully and let the router reboot.
Conclusion
If you have read through the complete blog then I’m sure you can now fix the “no Internet, secured” error in almost all the situations.
However, if none of the above remedies work, either the router hardware is malfunctioning or the issue is with your Internet Service Provider (ISP). Connect other devices to your wifi to test if the problem is with your laptop only. If different devices cannot connect, then either it’s time for a new router or contact your ISP because there may be an outage in your area.
Remember to test your connection after each step, as you might solve the problem sooner than expected.

